Piercing Aftercare

Be patient. Healing takes time.
Our simple-to-follow tips have been developed in line with professional piercing and health-care standards, ensuring your piercings heal as easily and quickly as possible, so you can focus on what matters: your fresh new look. We offer unlimited, complimentary Aftercare Appointments to help you achieve optimum healing time by providing expert advice on demand.
BOOK A FOLLOW UP APPOINTMENT
How to clean your new piercing.
- It sounds obvious - but washing your hands is THE most important step in caring for your new piercing. Never, ever, touch your new piercing with unwashed hands.
- Aim the NeilMed™ nozzle at the affected area and spray from a distance of 3 to 6cm
- Clean both the front and back areas of the piercing using a cotton tip, ensuring that any discharge or dried blood is completely removed.
- Gently pat dry the entire area. Avoid using toilet paper, cotton buds and cotton wool on and around the newly pierced area(s) as the material fibres can irritate the skin and cause infection. Make sure the area is completely dry. Moisture can encourage bacteria to grow, and negatively affect your healing process.
- Clean your piercing twice a day for 4-8 weeks
Follow your progress.
-
1
Week 1
For the first 72 hours expect localised swelling, redness, a warm pulsing sensation and a small amount of bleeding. These are all normal reactions that most people experience. For some people, some or all of these initial reactions can last for up to a week. Do not play with your piercing, wash your hands before cleaning the area and take care not to knock or catch your piercing during this period.
-
2
Week 2 - 4
The initial swelling and redness should have disappeared. You may still feel some feint pulsing, and you can still expect a fluid-like substance to expel from the ear and form a crust- especially at night when most healing happens. Treat your piercing with care and do not touch, unless you are cleaning the area or tightening the attachment as recommended. We recommend making an Aftercare Appointment during this period.
-
3
Week 5-12
Although you may not be feeling any discomfort at this stage, it is still important to remember the piercing channel will not be fully healed. We strongly advise that you avoid friction and irritation. Do not twist, push or pull the earring if possible. If you have exercised care and caution it should be time to consider downsizing your post to promote faster healing.
PRO/TIP - use a travel pillow at night and position your ear in the open area of the pillow.
-
4
3 Months +
This is where you MUST be patient...and where most piercings cause trouble. It's a familiar story. You think everything is OK, get excited and change your jewellery - only to find you are experiencing infection and keloid style scarring. New Piercings, and in particular cartilage piercings, take a long time to heal. Our #1 advice is to choose a piece of jewellery that you love for your initial piercing, downsize your post at the right time, and wait the full recommended period before changing your stack.

How long will healing take?
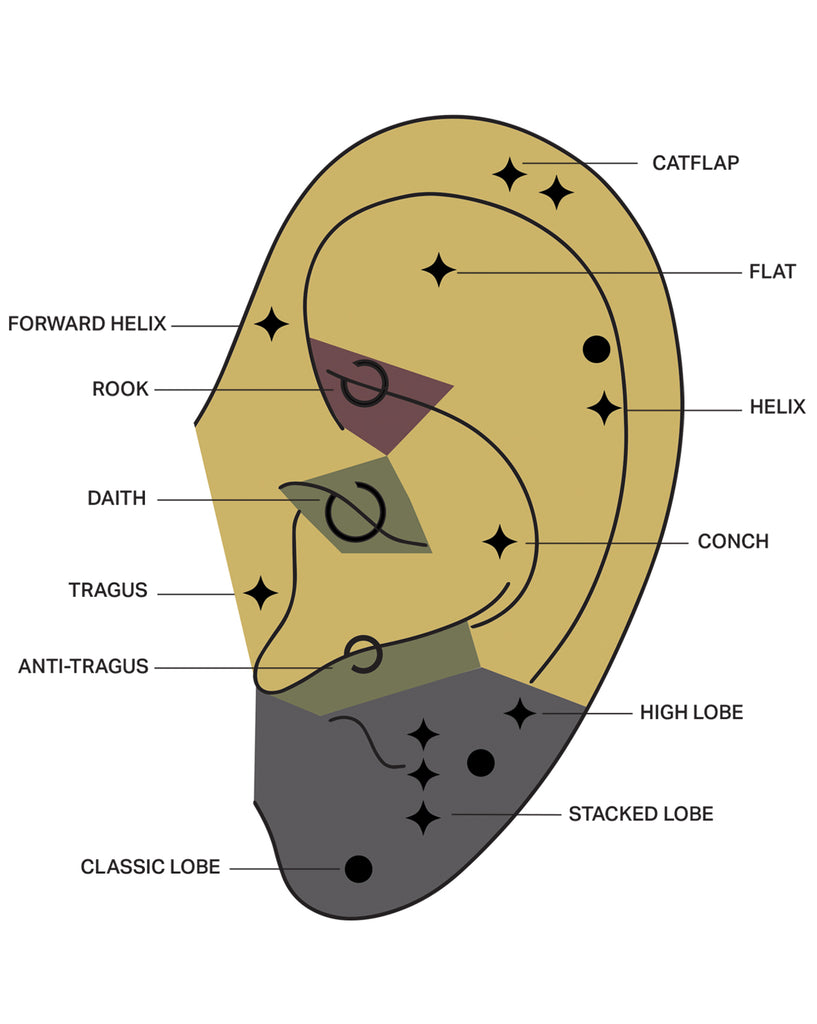
- 3-6 Months - Lobe, High Lobe
- 6-9 months - Helix, Fwd Helix, Flat, Conch
- 6-12 months - Rook
- 9-12 months - Daith, Anti-Tragus

Pro-Tips
- Stay calm.
In most cases, your piercing is not infected. Swelling, redness, pulsing and clear discharge are all completely normal reactions. Follow the Aftercare recommendations, and if the symptoms do not subside within a few days please get in contact with us for further advice. Always seek medical attention if you are feeling unwell, have abnormal discharge from the area or have severe swelling or bleeding. - Protect your piercing.
In many cases, an almost healed piercing gets caught on a hairdresser's towel or styling brush. Light adhesive medical tape to cover the piercing in these moments can help avoid painful knocks and tearing that will most likely increase the time it takes for your piercing to heal. - Choose your jewellery wisely.
Our #1 tip is to leave your jewellery in for the full recommended healing time. Cartilage piercings, in particular, have a nasty habit of 'flaring up', just when you think they are completely healed. If you love your jewellery, you won't want to change it = a perfectly healed piercing forever.